
How to make an air-dried clay BJD
I’d like to share my process for making BJDs (ball-jointed dolls) using air-dry clay and polymer clay. These two types of clay require different techniques. Let me start by introducing how to make a BJD with air-dry clay:
A. Air-dry Clay
1. Purpose
BJDs made with air-dry clay are often used as prototypes to create molds for casting in other materials like resin or porcelain. However, if you don’t have the means to make molds, you can still use air-dry clay to create a finished BJD.
2. Advantages and Disadvantages
a. Advantages
- Easy to sculpt, shape, carve, sand, and refine as desired.
- Relatively affordable.
- Quite solid and sturdy once fully dried.
b. Disadvantages
- Not water-resistant.
- Produces dust during sanding (inhaling clay dust over long periods can be harmful to health).
- Pure white or ivory in color; it doesn’t naturally resemble human skin tones, so you’ll need to paint the surface if not using it for mold-making.
3. Tools and Materials
- Paper and pencil.
- Clay: I use Ladoll Premix, which works very well. It costs about 140,000 VND per bag (~$6). You’ll need about 1.5 bags for a ¼ scale BJD (this is plenty, including room for mistakes or redo).
- Core materials: foam, skewers, straws, etc.
- Sculpting tools: mostly hand sculpting, but you can add small tools like ball styluses, soft shapers, and thin wire.
- Cutting and sanding tools: craft knife, sandpaper.
- Elastic string for assembling the BJD.
- Skin-tone paint.
- Brushes or an airbrush (depending on your resources).
- Sealant for protection.
Additional note: I recommend using protective goggles and a mask during sanding to avoid inhaling dust. Also, keep your workspace away from eating and sleeping areas, as it can get quite dusty.
4. How to Make It
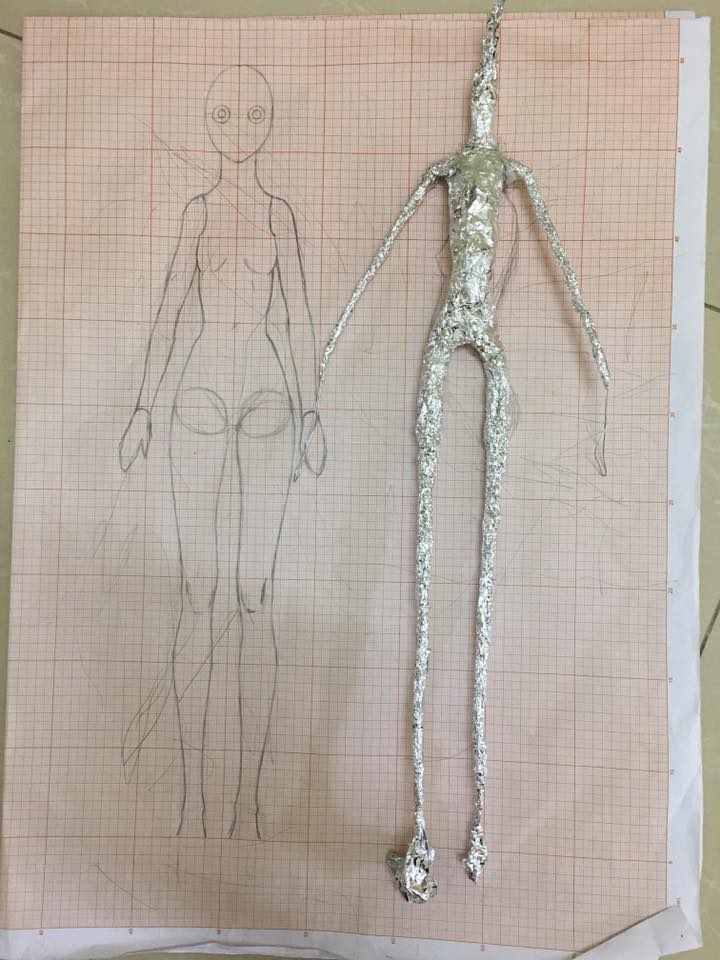
Step 1: Design a proportional sketch for the BJD
This is a very important step because it determines the proportions and appearance of the finished doll. Prepare carefully. I usually study human anatomy and proportion references to plan my BJD design. Most of my references are found online.

Step 2: Build the BJD core
Based on your sketch, make a foam core for the BJD. The core will typically have four main parts: head, torso, two arms, and two legs (alternatively, you can create the torso and legs as one piece and cut them apart later).

Step 3: Basic sculpting
I usually start with the torso:
- Roll out a clay sheet about 3–5mm thick and wrap it around the torso core. Press the clay tightly in one direction to make it adhere, then trim off excess clay.
- Once the basic torso shape is formed, begin adding details and refining the form.
- You can sculpt the legs after the torso. When the clay is almost dry, cut the legs off and start detailing them separately.
Because I make smaller BJDs (about 34cm), I apply clay directly onto skewers for the arms.
Sculpt the rough shapes for the head, hands, and feet to visualize the overall figure.
Note: When building the core, plan ahead for the diameter of the channels needed for elastic stringing. I’ve made the mistake before of leaving the arm and leg hollows too narrow for threading elastic.

Step 4: Removing the core
When the clay is almost dry, use a knife to split the torso into two halves and remove the foam core. (If you’re new to this, it’s safer to let the clay dry completely and use a sharp X-Acto knife to cut gradually to avoid cracking)
Alternatively, if the core is made of soft foam, you can leave the torso whole and dig out the foam without splitting it. (But don’t glue or insert wires if you want to remove the core this way)
- To rejoin the two torso halves (if you’ve split them vertically), mix clay with water to make a slurry, brush it onto the cut surfaces, press the pieces back together, and let it dry. (This clay slurry is very useful later too)
For the legs: if it’s too difficult to remove the core, you can cut them in half and use the same method as the torso.
For the arms: since they’re sculpted over skewers, just remove the skewers.
For the head: cut along the upper circumference (like how commercial BJDs are constructed).

Step 5: Sculpting the joints
My BJDs typically have the following joints: neck, torso, shoulders, thighs, knees, elbows, wrists, and ankles.
- Single joints allow the arms and legs to bend about 90°.
-
Double joints provide more flexibility (160–170° bends).
The doll in my photos has double joints at the elbows and knees and single joints at the hips.
Examples of joints:
- Neck joint: Sculpt a ball the same diameter as the neck and attach it using clay slurry. Once dry, carve a socket into the head large enough for the neck ball. To get a perfect fit, press the neck ball (wrapped in plastic) into the wet clay socket and smooth it out.
- Torso joint: Cut the torso in half horizontally. Add a ball joint to the lower torso, then carve a matching socket in the upper torso.
- Thigh joints: Sculpt two balls and attach them to the tops of the thighs. Carve matching sockets into the hip area of the torso.
- Knee and elbow joints: After cutting off the legs and arms, split them again where the joints should be. Sculpt double-jointed pieces by combining two balls with a middle section shaped like a knee or elbow.
- Wrist and ankle joints: Add ball joints and embed thin metal rods across the hands and feet for hooking elastic later.
- Shoulder joints: Sculpt ball joints similar to the thigh joints.
💡 Important: All joints must have hollow channels for threading elastic. Insert straws or skewers while the clay is still soft, or carefully drill holes later once fully dry.
Step 6: Refining and detailing
After building the basic form and joints, focus on fine details like the face, hands, and feet.
For delicate fingers:
- Use thin wire wrapped in cotton (glued in place), then cover with clay and shape the fingers. Once dry, join the fingers to form the hand and refine details.
For toes: this is optional as they usually don’t need the same delicacy as fingers.
Step 7: Sanding and finishing
I sand as I go, but you can wait until the sculpt is nearly complete and then carefully smooth all surfaces for a professional finish. Make sure joints are sharp and clean.
I recommend 3M sanding sponges because they’re soft and don’t leave hard edges on intricate areas like faces, hands, and feet.
Step 8: Painting and sealing
I use Padico Doll Finisher and Doll Finisher Clear at this stage:
- Mix skin tone pigment into Doll Finisher and brush it onto the doll. (If you have an airbrush, the result will be smoother.)
- Seal with Doll Finisher Clear.
- Finally, add face-up and body blushing.
Step 9: Stringing the doll
(I’m including this step to make it easier for beginners to understand BJD assembly.)
- Arms: Prepare a loop of elastic (specifically for BJDs; you’ll probably need to order this online). Hide the knot inside the torso and use a metal hook to pull the ends through the arm parts, finishing at the hands where they hook onto a metal rod.
- Torso and legs: Use a long elastic folded in half. The knot goes at the neck and passes into the head. The two ends go through the torso and hips, then down through each leg part, finishing at the feet.
This completes the stringing process. And the image below is my first air-dried clay doll.

This is my basic guide for making a BJD with air-dry clay. If you’d like me to clarify any step, please leave a comment below. If you find this helpful, please like and share (with credit) to support the page ❤️
I’ll write and share the polymer clay BJD tutorial next!
Update: Here is the link to part 2: How to make a polymer clay BJD
#handmade #bjd #doll #howtomakebjd #nganguyenartdoll #art #artdoll #tutorial #airclay #stepbystep
Nga Nguyen