
How to make a polymer clay BJD
Hi everyone!
I’ll keep this really short and share how I make BJDs using polymer clay. (The previous post was about air-dry clay.)
Ladoll and polymer clay are often used to create BJD prototypes for casting resin dolls. However, if you don’t have the means to make molds, you can still use these two types of clay to make finished BJDs – though their hardness and durability can’t match resin.
😃 Advantages of polymer clay for making BJDs:
- Skin-like color and surface – no need for additional skin tone spraying.
- Water-resistant.
😞 Disadvantages of polymer clay for BJDs:
- Harder to fix mistakes.
- Relatively heavy.
- Requires meticulousness and experience during sculpting.
1. Preparation:
a) Polymer clay:
- There are many types of polymer clay. After trying Living Doll Sculpey and Premo Sculpey, I found Premo to be harder (so it’s tougher to knead, which can be painful for your hands 😣). Living Doll was about 465,000 VND when I bought it; Premo was 640,000 VND.
- To make kneading easier and the clay more pliable, I use baby oil – a lightly scented oil that also masks the slightly strong smell of the clay. A small bottle costs around 30,000 VND.
b) Core:
- Aluminum foil (since it’s baked at high temperatures, avoid using paper or foam as they can catch fire).
- Bamboo skewers for small parts like arms, or disposable chopsticks for larger parts like legs.
c) Sculpting tools:
- Soft shapers: essential for detailing and smoothing the clay’s surface. Polymer clay differs from Ladoll – while Ladoll work relies heavily on hand sculpting, polymer clay benefits from tools for creating smooth surfaces and precise details. (Sanding polymer clay often leaves scratches and requires extra steps to fix.)
-
Ball styluses: for shaping detailed areas.
The basic tools cost around 300,000 VND.
d) Oven:
- Absolutely do NOT use a microwave – it won’t work for baking polymer clay.
- I don’t have much experience choosing ovens, but in general, the higher the price, the better and more stable the temperature. I opted for a basic oven (around 1.2–1.5 million VND), but the temperature fluctuates a lot, so I have to adjust it manually.
- A baking thermometer is crucial to ensure the oven temperature stays within the clay’s recommended range. For Premo Sculpey, bake at 130°C for 15 minutes per 6mm thickness.
- To avoid burns, I use thick oven mitts.
- To avoid inhaling fumes, I wear a mask or respirator and bake in a well-ventilated area.
e) Paint: Colored pencils and acrylic paint.
f) Other tools: Pliers, tweezers, scissors, trays, cloths, etc.
2. How to Make It:
🌸 Step 1: Preparation
- Cut the clay into thin slices, add baby oil, and knead until soft, pliable, and cohesive. This step is critical – the more thoroughly you knead, the stronger and smoother the final piece will be. I also mix skin tone pigments into the clay at this stage. Uneven mixing will leave unsightly streaks.
- Keep your tools, surfaces, and hands absolutely clean – polymer clay attracts dust and debris easily, which is hard to fix once embedded. Store completed parts in airtight containers to avoid contamination.
- At first, working with polymer clay feels harder than Ladoll, but the material itself feels more like human skin. My first polymer clay doll looked like something out of a horror movie 😣, but it got better with practice. Don’t give up if your first attempt doesn’t turn out perfect!
🌸 Step 2: Sculpting
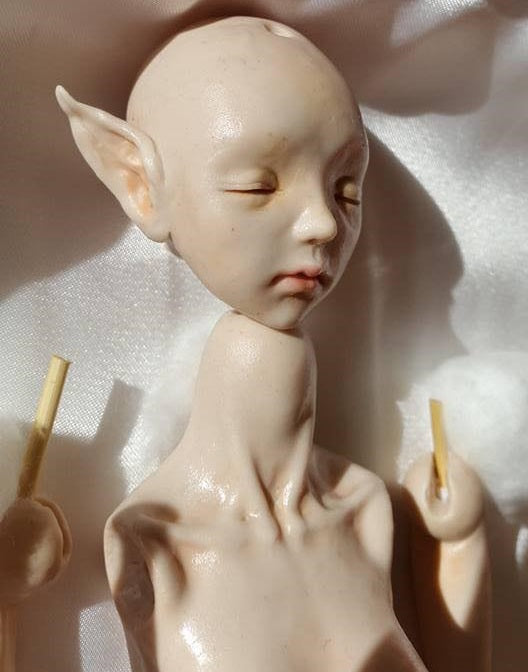
- Head: Roll aluminum foil into a ball (smaller than the finished head size) around one end of a skewer for easy handling. Cover it with a thin layer of clay, insert glass eyes (if desired), then build up clay around the eyes to sculpt the face.
- Torso: Wrap foil around a wooden stick, cover with clay, and sculpt the torso shape. Create sockets for joints using a plastic ball or any round object. Wrap the joint area in plastic wrap to prevent sticking.
- Arms and legs: Wrap foil around skewers or chopsticks, then sculpt clay over them.
- Hands and feet: I prefer sculpting these with polymer clay because they look very realistic. (Here’s a video showing how I sculpt hands)
🌸 Step 3: Baking
- If you want the colors to set deeply, apply paint before baking. However, note that baking may slightly alter the colors – test first!
- Bake each piece as soon as possible after sculpting. If left too long, the clay may lose its oils, making it weaker and prone to crumbling.
- Place a layer of cotton padding on the tray before baking to prevent distortion.
- Follow the manufacturer’s baking instructions carefully for time and temperature.
- After baking, leave the clay in the oven to cool completely before removing it to avoid thermal shock and cracking. Even then, I wrap warm pieces in a cloth as they cool.
- Note: Polymer clay emits fumes while baking. Use proper ventilation and wear protective gear.
🌸 Step 4: Finishing
- Once fully cooled, remove the cores gently (pliers may help).
- Trim excess clay and sand lightly if needed.
- Add color (if not pre-baked), then assemble and string the doll.
Some artworks of me:


Since I don’t have much time, this is just a brief overview of my process – to document and share a bit of my personal experience with fellow handmade doll enthusiasts.
Thank you for reading until the end! ❤️
👉 Link to Part 1: How to make an air-dried clay BJD
Tags: #handmade #doll #polymer #BJD